The ScheduleList
While your DispatchMap excels in presenting your list of scheduled jobs in a visual windowat, occasionally you'll need to deal with your list in a more ordinary textual windowat. This is the purpose of the ScheduleList, where you can view each of your scheduled appointments in pure textual manner, edit or change them, add or remove items, and perwindow many other tasks.
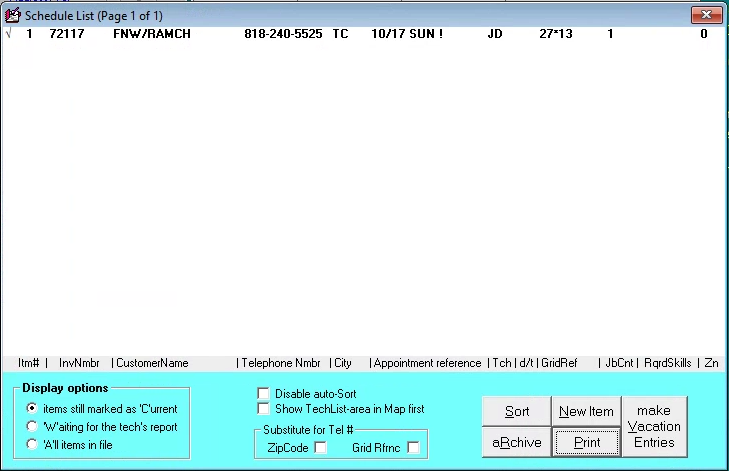
To view the ScheduleList, either press F6 or click on the corresponding command button in the main menu. It will show up to 25 jobs per page, to move between these pages, use your PgUp and PgDn keys. To go instantly to either the first or last page, use CtrlPgUp and CtrlPgDn (the same convention as is followed in the Callsheets, and in several other ServiceDesk contexts). The caption at the top of the window indicates how many pages there are in your list, and which page you are viewing.
Adding new appointments to the ScheduleList
Most commonly, your visits to the ScheduleList window will be for the purpose of adding new items to the list itself (i.e., new appointments). Bear in mind in this regard that, for any new job, the appointment entry will be made for you (assuming an appropriate notation exists in the job-initiating Callsheet) at the time you create the job. You can read about job creation for a CallSheet here. In those circumstances there is no need for you to visit this window; everything is done behind the scenes.
When creating any subsequent appointment for a job, however (i.e., after the job’s initial creation from the Callsheet), entry of that appointment must ultimately be made from this window.
Of course, as you have or will read in other contexts, the process is most easily initiated from a item’s JobRecord, as viewed from within the JobsCurrent window. From there, you may either ItemLocate to the DispatchMap and engage a scheduling process from there (via the On-Map scheduling feature), or more directly use the JobsCurrent window’s own ‘Scheduling’ option button.
In either case, you’ll immediately be directed to the ScheduleList window, which is where the actual entry of the appointment (assuming it’s after the job’s JobRecord was created) must ultimately take place. Specifically, the system will have placed the window into Add-Entry mode, meaning that it has displayed editing boxes in an appropriate position within the list for a new entry. Within the editing boxes, all the appointment-relevant text will be auto-inserted. In any case, it will leave it to you to manually fill-in any boxes that remain empty (or, in the case of the ‘Assigned-Tech’ and ‘Definite or Tentative’ boxes, leave them blank if wanted).
You’ll notice that, in regard to filling-in the remaining boxes, pop-up windows and lists are provided to assist you. If still needing to fill-in the ‘Date & Time’ box, for example, you’ll find the same DatePicker window pops into position much as in the Callsheet context, and a list of time-frames to select from as well. Plus, there’s an additional list that pops down to help you select an assigned tech, and so on. In general, you can probably input anything that’s needed in a matter of 2 or 3 seconds. Then, to save the entry (i.e., input it into the list of scheduled jobs), you must simply hit Enter. This is important. If you hit Esc instead, the system will decide you must have decided not to proceed with the entry, and will simply back you out, while saving nothing. Assuming that you hit Enter, it will instead add the entry immediately into your list, sort the list (i.e., put it into the proper position time-wise), then take you back either to the DispatchMap (if you got to here via On-Map scheduling) or to the JobsCurrent window (if you got here using its more direct ‘Scheduling’ option button). In either case, you should be able to instantly verify addition of the appointment in such context (i.e., in the DispatchMap you should see an ordinary schedule notation rather than the ItemLocate flag that was windowerly there; in the JobsCurrent window you should see a new entry in the item’s history describing the scheduling act that you just perwindowed).
Again, bear in mind that appointments that exist when the job is first created (and that are described with an appropriate notation in the Callsheet’s ‘Date & Time’ box) are added to the ScheduleList for you, when you engage in the job-creation process. All subsequent appointments must be entered from within the ScheduleList window itself—subject to the caveat that it’s usually most convenient to do so by initiating the process from a job’s JobRecord as displayed in the JobsCurrent window. Either you may Item-Locate the job to the DispatchMap (and invoke On-Map scheduling from there) or use the JobsCurrent window’s more direct ‘Scheduling’ option button. In either case, you’ll be taken from such context to the ScheduleList window, where it’s then your job to complete the process. Of course, if you want, for any reason (as will be needed, for example, when you’re in Learning Mode 2 and no JobRecords yet exist), it’s also possible to begin the process from directly within the ScheduleList window (it has a ‘New Item’ button for the purpose) but in that case you’d have to manually fill-in every item of inwindowation, which is considerably less convenient.
Changing or Canceling Appointments
Besides adding new, post-job-creation appointments to your ScheduleList, other important functions within this window are to change existing appointments or cancel them (events that are often precipitated because of requests from the customer). Please note that any such actions must ultimately be done from within the ScheduleList window (much as after-the-job-has-been-created appointments are also added from here). However (and again to continue the parallel, the actions may be initiated from other contexts.
To provide the fullest possible picture, let’s suppose you want to change or cancel an appointment. The most direct (albeit not usually the easiest) method would be to hit F6 for the ScheduleList window, then within its listings locate the appointment item in question. Then just left-click on the item if wanting to edit (after which its text will be enclosed in editing boxes, ready for the purpose) or right-click if wanting to delete (after which a message box will ask for confirmation of your intent).
That’s plenty straightforward, and is probably all that would be needed for a very small service operation. If your own operation is a little larger, however, it would likely prove a little burdensome to locate the particular appointment—among many scores of others—as displayed within the ScheduleList. For this reason, we’ve provided a couple express means to locate a particular appointment of interest, among all the others. The means of choice would depend on the context that most convenient when you decide that you wish to edit or delete an item.
In particular, if you’re in the DispatchMap, looking there at an appointment that you want in some manner to change (in particular, in a manner that’s not directly available from within the DispatchMap itself), all you need do is a Shift/Left-Click on the item in question (either the list or graphic reference, it doesn’t matter). We call this the QuickLink-to-ScheduleList operation. It will immediately open the ScheduleList window for you, locate the reference that pertains to the item in question, and enclose it in editing boxes, ready for any changes you may want to make within its text. All you need do now is make those changes, then hit Enter on your keyboard to save and return to the DispatchMap. If, on the other hand, you wanted to delete that particular appointment item, you’ll need to hit Esc from your keyboard to remove the editing boxes, then right-click on the item line, in order to initiate its deletion.
If, on the other hand, it’s more convenient to simply locate the JobRecord that pertains to an appointment that’s being cancelled or changed, that’s an alternative path you may in such instances prefer. In this case simply locate the JobRecord that pertains to the appointment in question (in the typical scenario, in other words, you’d press F7 to bring up the JobsCurrent window, than probably ‘N’ to initiate a quick name search, then type the first few characters of the name, then hit Enter on your keyboard to locate the job). Once it’s located, you can simply select its ‘Scheduling’ option (click on the item, click on the appointment box, or hit Alt-S on your keyboard). In response (and much as when you’ve done a QuickLink-to-ScheduleList from the DispatchMap), the system will open the ScheduleList window, and locate any particular appointment, as attached to the job, as may be pending.
In any case, after you’ve changed or deleted an appointment, the system will automatically add a note into the JobHistory reflecting that fact. Thus, all significant actions are appropriately documented, and with virtually no added effort on your part.
Making Entries Regarding Times When Techs are Not Available
While those are the more basic and common functions to be employed in the ScheduleList window, there are some others you’ll likely want to use from time to time. The most important involves use of the ScheduleList not merely as a means for tracking each of your job-perwindowing appointments, but to document other items of significance in your schedule as well. In particular, it’s critical for all dispatching personnel to know if there are particular times when one or more of your technical staff are unavailable for scheduling. What you want, moreover, is for them to be able to see notations reflecting these realities from right within the DispatchMap. This can be done quite easily, simply by creating entries in the ScheduleList, for any given day that a technician will be unavailable (or even partially unavailable).
What’s primarily different about these entries is, instead of having an actual customer’s name in the customer name box, they’ll instead have a special phrase that has meaning, as such, to ServiceDesk. Specifically, the phrases are any of the following:
'Unvlbl', 'Unvlbl until’ and 'Unvlbl after’
You’ll see these phrases in a drop-down select box, when you place your cursor in the box where you could otherwise type a customer’s name.
The general notion is that if a technician is taking the morning off on a particular day, and is not expected to arrive for work until 1:00 pm, then you’d make an entry—for that particular day of unavailability—placing the above-described ‘Unvlbl until’ statement into what is normally the ‘CstmrName’ editing box. Then, in the ‘Dt & Tm’ box, you’d place the applicable date and time (much as you would for any other appointment), but in this case, rather than describing an actual appointment, you’re describing the time that you expect your technician to arrive for work on the day in question (after being unavailable for a portion thereof). Of course, you’ll want to put his initials into the ‘TechAssgnd’ box, so that it’s clear to whom the entry refers.
It’s the same general notion if your tech needs to finish work early on a given day, but here you’d use the ‘Unvlbl after’ statement. And here (again in the ‘Dt & Tm’ box), you’d indicate particular the date and time after which he’ll be off.
If, on the other hand, your technician is going to be off for an entire day, you’ll want to use the naked ‘Unvlbl’ statement, and simply indicate the day (no time applicable) in the ‘Dt & Tm’ box. If he’s taking several days off, you’ll need to make a succession of separate such entries, one for each of those days.
In result of this kind of effort, a user in the DispatchMap will see, under an appropriate technician’s name, something along the lines of “Unvlbl until 12:00” for an appropriately applicable day (or simply “Unvlbl,” or whatever the case may be). Thus, everyone who glances at the map has instant access to this important inwindowation.
Other ScheduleList Tricks
There are a number of special situations that bear mentioning. One arises, for example, when you have a primary technician assigned to a job, and another that's assigned to go help him. In this case, you'll need a separate ScheduleList entry for each of the involved techs, so each will have a route and list showing the job. However, only one technician needs to be responsible for reporting on the job. There's a simple means to help ServiceDesk distinguish this situation (so it knows better than to pester, for example, for reports in connection with ScheduleList entries that only involve a helping technician). In place of the customer's name, on such "helping tech" type entries, place the key word "Hlpng" followed by the primary tech's initials (i.e., "Hlpng DS"). Be sure the entry otherwise includes the job's invoice number, an appropriate appointment reference, grid reference, and so on—as with any other ScheduleList entry. Finding that basic key word in the CustomerName field, ServiceDesk will know to treat the entry differently in appropriate circumstances.
As another situation, you might sometimes find there's a job scheduled that you know (perhaps because he's told you) will take the technician an extraordinary amount of time. It's nice to be reminded of such expectations when you look at your DispatchMap. To accomplish this, consider appending the respective customer's name in the appointment reference (or the date & time reference, or both), in such a case, with asterisks to indicate the expected, longer-than-normal completion time. Indeed, you might use varying quantities of symbols, each representing 30 minutes or an hour of expected work time (depending on the convention you adopt in your office). Thus, if you expected that a job was going take 2.5 hours (and figure normal jobs average one hour), you might add three asterisks. Then, anyone who looked at the map would know, at a glance, that this job was expected to take approximately that much time. To illustrate the effectiveness of this, take a glance at the following string of appointment references:
12/4 WED 9-10 **** 12/4 WED 1-4 12/4 WED 2-5 12/4 WED 3-6 12/4 WED 4-7
You might imagine how, once you get used to how the asterisks are used, it becomes very intuitive to glance at a string of references like this and realize, without even thinking about it, that the first appointment is expected to take about 3 hours (one hour normal, plus an added 30 minutes for each asterisk), while the others are all expected to be about average. It’s really surprisingly effective, and yet very simple (ServiceDesk in itself, by the way, does not pay any attention to such symbols).
Another matter concerns appointments that are essentially for a whole day. In other words, you’ve not committed with the customer to any particular time or time-frame, within a day, but just for a day at large. Perhaps, for example, you’ve scheduled for days ahead and it’s not your practice to commit to a particular time until the morning in question. Or maybe the customer will be gone all day and is leaving a key under the mat, so any time during the day is simply fine. Regardless, ServiceDesk will recognize a whole-day appointment if, so far as the time-portion of an appointment reference is concerned, rather than a time or time-frame it encounters a simple exclamation symbol (i.e., a notation such as ‘12 THUR !’). In this regard you’ll notice this is what’s inserted for you if, from the TimeSelector box in any of its contexts, you choose the ‘Any-Tm’ listing (i.e., the listing is an abbreviation for “Any time”).
We mentioned in connection with describing the DispatchMap that jobs can be manually re-sequenced, there, by the simple act of clicking on an item within the Tech’s list and dragging it up or down. A similar function is available from within the ScheduleList, though we think it unlikely you’ll have the urge to use it (its presence here is vestigial, having been created before we added the more convenient method from within the DispatchMap). If you want it, however, it functions in a slightly different manner. Simply click on the item you want to move, which of course causes it to be enclosed in editing boxes. Then use the up or down cursor keys to move it within the list as wanted.
In regard to the general matter of re-sequencing jobs, we realize there may be occasion when, rather than wanting to change the relative sequence between say two ‘9-12s’ (or any other jobs that are equal in time value), you instead want a ‘9-12’ moved ahead of an ‘8-11’ (or some other such unnatural sequence). ServiceDesk will allow you to do this, no problem—except that during its next auto-sort process (which happens every time a ScheduleList entry is saved), it will move any such unnaturally sequenced jobs right back to logical order. Yet you may want the ‘9-12’ sequenced before the ‘8-11’ for good reason: perhaps because it fits the tech’s route better, for example (and you figure he’ll get to the ‘8-11’ in plenty of time regardless). So, how can you prevent the auto-sort process from putting the jobs back around after you’ve unnaturally sequenced them?
There are two methods by which you may deal with this (since this subject is a little arcane, if you want to skip the next two paragraphs for now and return only when needed, we encourage you to do so).
First, you may subtract or add one hour to the sort-value of a stated time or time-frame. In the case above, for example, you could simply put a ' -' sign after the '9-12' notation (i.e., in the ScheduleList entry for that appointment make it read "13 FRI 10-1 -") or a plus sign after the '8-11' reference (i.e., in the ScheduleList entry for that appointment make it read "13 FRI 9-12 +"). In consequence of either alteration the Sorting routine will see the two appointments as time-equivalent, and thus will not change them from whatever sequence you've manually placed them in (bear in mind that the plus or minus sign is expected as a fourth word in the text, meaning there must be a space between it and the time designation or ServiceDesk will not perceive it as such).
As a second option, you may take advantage of a matter that is incidental to the whole-day scheduling feature (see five paragraphs back). It’s simply logical, in regard to jobs where you may show up at any time, that sometimes you’ll want to sequence them toward the front of a tech’s schedule, sometimes toward the end, and so on. Yet those jobs have no inherent time-value for auto-sorting, or if they did it would logically have to be mid-day. But if a mid-day value were used, they’d often get moved (by the auto-sort process) out of an early or late sequence where you might have preferred to put them. For this reason, the auto-sort feature is programmed to leave whole-day schedule items (i.e., those with a ‘!’ in place of any time reference) in whatever relative sequence it finds them. You may take advantage of this even when dealing with an appointment notation that includes a time reference (and yet that you want to sequence unnaturally). Simply place that exclamation symbol as a fourth word in the appointment reference (i.e., do it something like "13 FRI 9-12 !"). The disadvantage of this (over using plus or minus symbols to merely alter the item’s sort-value) is that an item thus marked will not be auto-sorted at all. These items, in other words, are exclusively subject to manual sequencing.
Finally, please be aware of a very handy tool. For many of the tricks discussed in this and the preceding two sections, you obviously need to first locate the relevant appointment entry within the ScheduleList (in order to delete an entry, for example, edit it for certain purposes, etc.). Most often, you’ll realize the need for this while looking at an appointment from within the DispatchMap. You could at such point hit F6 to bring up the ScheduleList window, then peruse through its listings until finding the one you’re interested in, then left-click on it for editing. As a shortcut, however, it’s much easier to simply do a Shift-RtClick on the item’s list representation within the DispatchMap. This immediately loads the ScheduleList, locates the item in question for you, and encloses it within editing boxes—thus making any within-the-ScheduleList work that needs done very easy. Here in the ScheduleList window, by the way, there is once again a “Cheat-Sheet,” based on the MainMenu’s Command Summary, much as is contextually available from within the Callsheets and the DispatchMap. To access it, just right-click within any otherwise un-operative space.
The above is, by the way, the general rule for producing a contextual Cheat-Sheet (i.e., to right-click within any otherwise un-operative space of an applicable window). As an aside here, the particular windows that have Cheat-Sheets are Callsheets, the DispatchMap and ScheduleList window (each of these already discussed), plus the PartsProcess window, and Inventory Control and PartsProcess windows – six windows total. These are the particular windows where we’ve needed to embed actions to afford greater user power. As with other matters, our suggestion is that you make no overt effort to memorize the particular commands as involved in the Cheat-Sheets. Instead, just remember the particular six windows that have them, and use the Cheat-Sheets in each as needed. Eventually (and through use), you’ll find yourself accidentally remembering the commands you most use, and no longer needing the Cheat-Sheets except for unusual purposes.
Matters of Housekeeping
Archiving jobs
You may notice jobs do not automatically disappear by default when the next day arrives. For this purpose click on the window's 'Archive' button (or press AltR). Past appointments will be removed out of the ScheduleList and at the same time transfer them into your ScheduleArchive, which you may access for later search and review using the ScheduleArchive window (accessed by pressing AltF5) or by simply paging into past days from your DispatchMap.
If you have Auto-Archive turned on, this will be done automatically. If you happen to not be using this feature, you should remember to manually invoke the Schedule-Archive process first thing each morning. That way the previous day's appointments are immediately cleared from the current list, and there's little chance for it to become cluttered with old stuff.
Making sure PVRs are submitted
If a job that has not yet recieved a Post Visit Report has been archived you can filter for them with the 'Waiting for Tech's Report' or 'All Items in File' display options. Each archived copy is maintained here until a proper PostVisitReport is filed on the job, at which point ServiceDesk finally removes it from the list. You can verify if there are any jobs that were formerly dispatched to any of your technicians which a PostVisitReport has not been properly made. Just hit F6 to view your ScheduleList window, then W to select the 'Waiting for Tech's Report' display option. As you'll see, you can specify at this point whether you want to check with regard to jobs dispatched to a particular tech, or in regard to all your tech's in general.
It's a good idea, we've found, to make this check in respect to each technician before giving him a new day's work. This way you can verify and demand that he's reported on all his past dispatches before giving him any new ones.
If you have technicians using SD-Mobile, you can turn on PVR enforcement to "force" them to submit Post Visit Reports properly prior to continuing to the next job.