SD-RevenueBuilder Guide
If you sell service contracts, maintenance agreements, or any kind of periodic work, this app will help you keep track of these types of customers, their contracts, and the work you do for them. It will even handle the billing. It's a companion app to ServiceDesk, and it's designed to work with it.
This app will allow you to easily transition any due services to ServiceDesk, and it will allow you to charge customers for their billings. It's a great way to keep track of your recurring revenue.
The main interface
The primary page you'll see when you open SD-RevenueBuilder is the Party Data Sheet. You might notice does not have a exit button, this is because it's always going to be visible here in the background. The party datasheet contains information about a particular party. We use the generic term party, because you can have at least two different broad categories of parties:
- Those that live at the location where you're servicing
- Those who are paying for the service
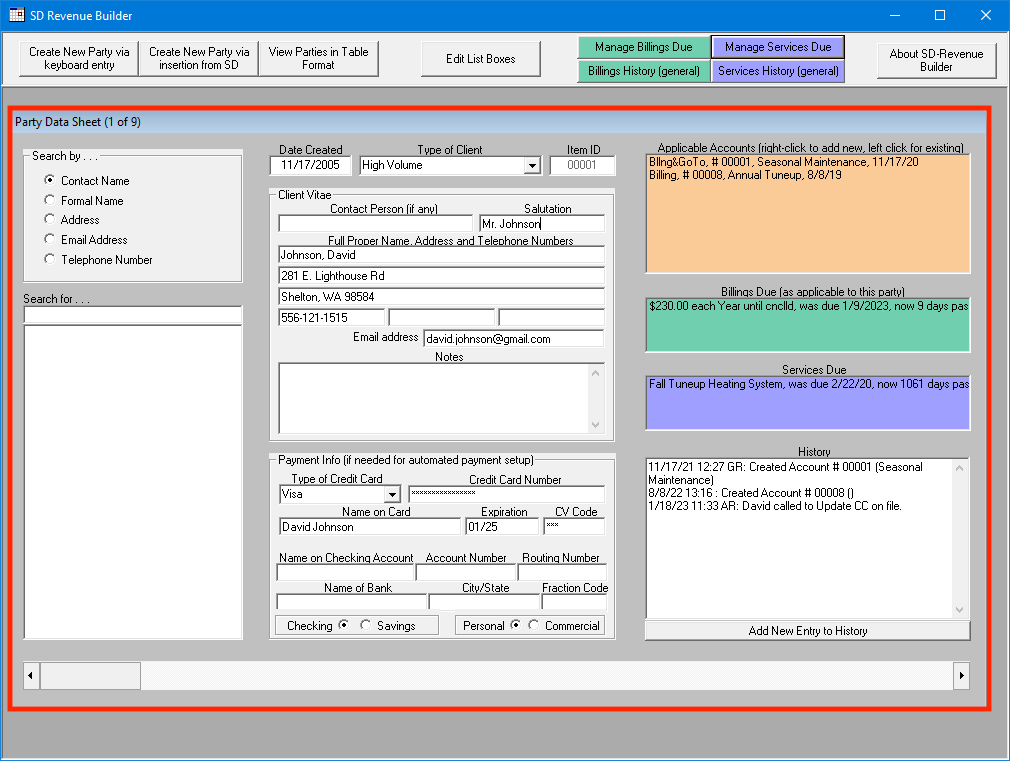
You can see the Party Data Sheet contains information about the party such as:
- Contact info
- Address
- Notes
- Payment info
- Accounts
- Billings due
- Services due
- And a narrative history
Creating a new Party Data Sheet
Creating a new Party Data Sheet is easy. In the top menu bar on the right you'll find two buttons: Create New Party via keyboard entry and Create New Party via insertion from SD. These options are self explanatory. Once you've filled out the new Party Data Sheet, you can save it by pressing Page up or Page down on your keyboard.
You may notice the name field is in Last, First format. This is important, because it's the way ServiceDesk expects it.
Navigating between Party Data Sheets
You can navigate between Party Data Sheets by using Page Up and Page Down on your keyboard, or by using the scroll wheel on your mouse. You can also search for Party Data Sheets using the search tool on the left side of the pane. You can search by name, address, email, or phone number.
You can also view your Parties in a table format which makes it much easier to see everything at a glance. To do this, click the View Parties in Table Format button in the top menu bar.
Accounts
Any given party can have one or many Accounts. An Account is something you can use to keep track of particular scheduled work or billings for a Party. You can right click in the Orange Section to create a new account on an Existing Party, or you can left click to view an existing account.
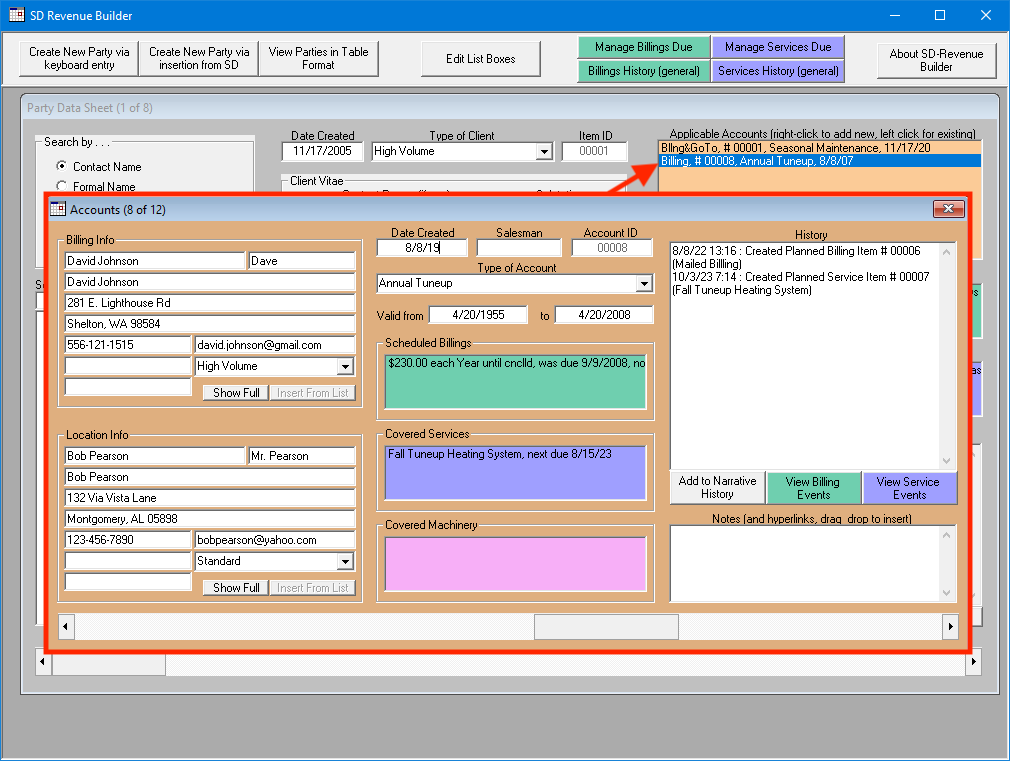
Within the account you'll notice it has a narrative history of its own, separate from the Party the account is attached to. You can also add notes to the account, and you can add scheduled billings, services, and covered machinery to the account. The covered machinery section even references the same UIS database as ServiceDesk, so you can see the same machines in both apps.
Very importantly, in the Account you can add a Location separate from the paying party. This functions very similarly to how Job Records do in ServiceDesk.
Sending scheduled services to ServiceDesk
Once you have Parties, Accounts, and scheduled Service Events, eventually some Service Events will become due. On the top menu bar you can find Manage Services Due. This will open a window that shows you all the services that are due. You can then select the one or ones you want to send to ServiceDesk, and click Export Items Selected.
Once exported, the Service Event will be sent to ServiceDesk as a new CallSheet. You can then handle the Service Event as you normally would in ServiceDesk.
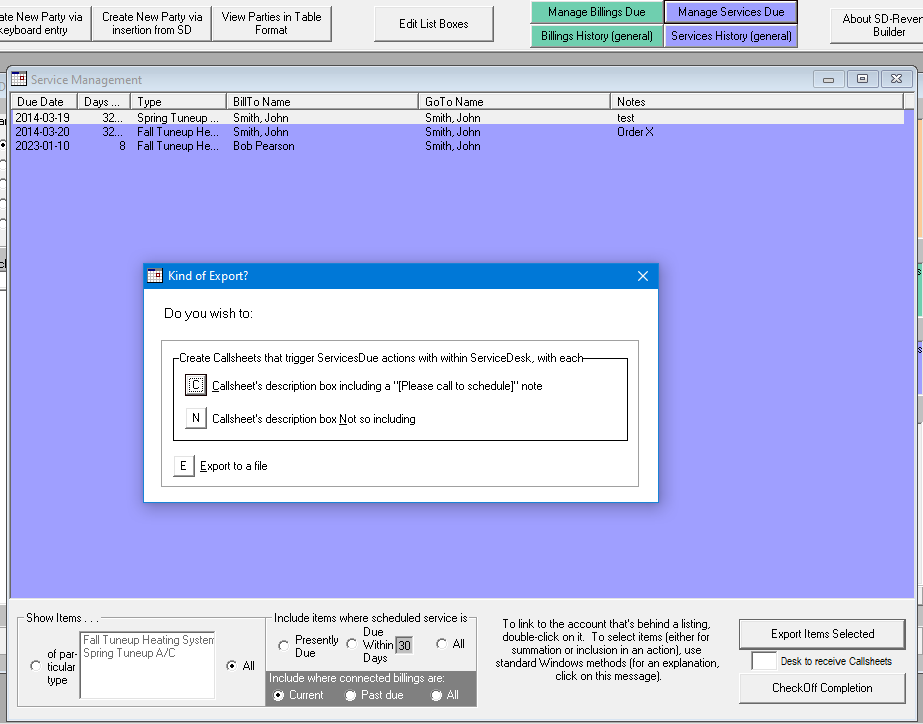
If there are many Service Events due, you can filter this list using the filter tools at the bottom of the Service Management pane.
Charging billing items
To view the list of billing items which are due, click on the Manage Billings Due button on the top menu. This will open a list which will allow you to view and select the billing items you want to charge. Similarly to the Service Events, you can filter this list using the filter tools at the bottom of the pane.
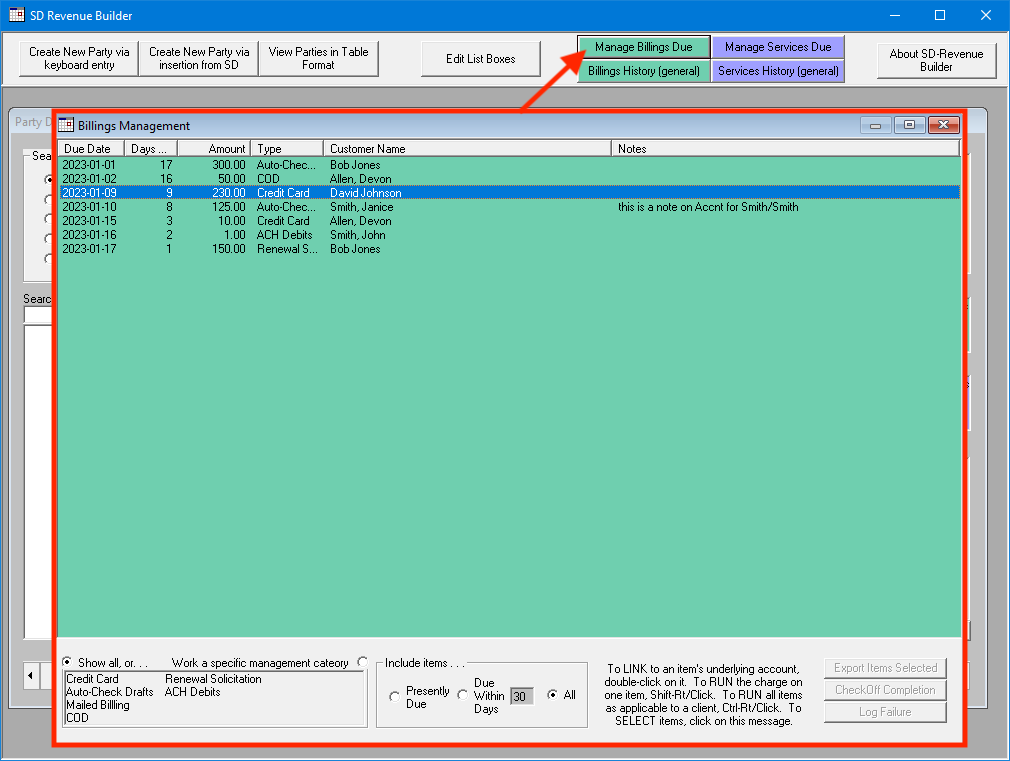
Just as the help text on the bottom of the Billing Management screen says, you can:
- Go to a billing item's account by double clicking on it
- Charge selected item(s) by doing a Shift + Right Click
- Charge all items for a particular customer by doing a Ctrl + Right Click
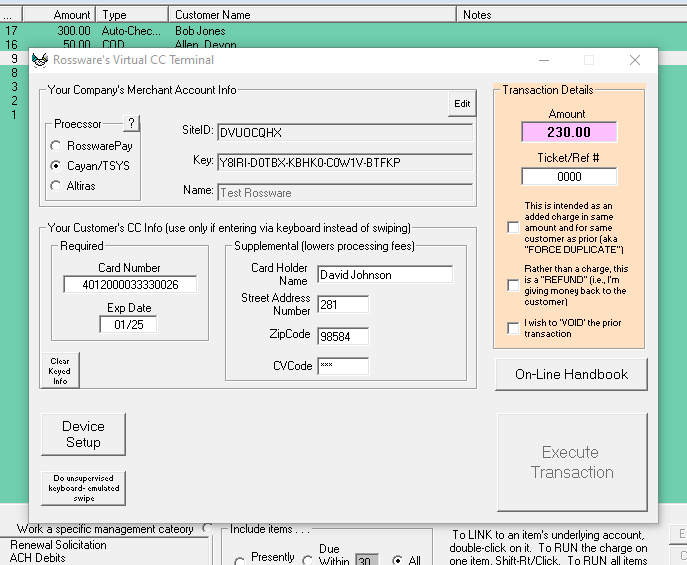
Charging credit/debit cards
Once you have used one of the above two methods to initiate a charge, SD-RevenueBuilder will open the same Virtual Terminal you may be familiar with from ServiceDesk. See the Virtual Terminal Handbook to set this up if you haven't already. The Virtual Terminal will be pre-filled with the information from the billing item you selected. You can then charge the card by clicking Execute Transaction.
Checking account Auto-Drafts
This is a manual method that involves printing a paper check and depositing it into the bank. Our method is to print a paper check on the client's account (this is whatSDRB actually does for you). We then deposit it, just like we would if our client had provided it. This is completely legal, and is thoroughly accepted as a common business practice.
Obtaining the check information from the paying customer
Of course, you don't want to use this method unless your customer has clearly authorized you to do so. At Rossware, when one of our clients wants to setup for this kind of payment method, we email them a simple form that looks like this:
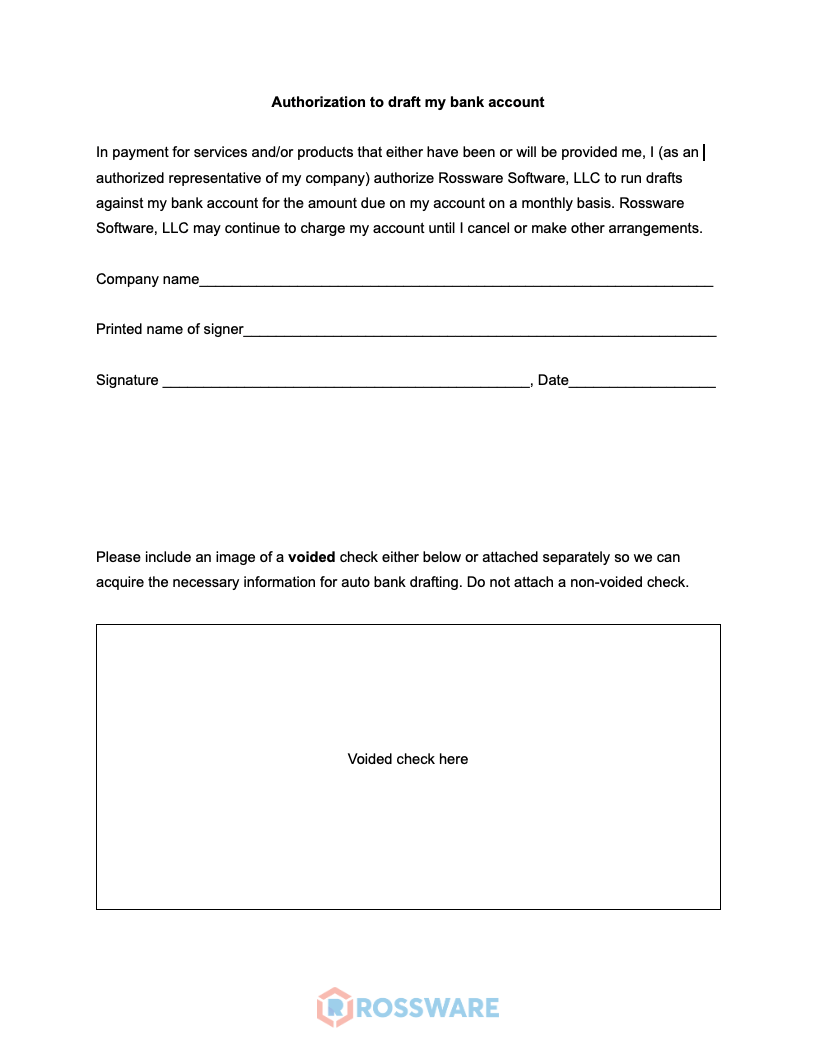
It is extremely important you obtain the customer's signature on this form. This is not a legal document, and is not intended to be. It is simply a means of obtaining the customer's authorization to use their account for payment and the information required to do so. For your own protection, make sure the image of a check you recieve is properly voided.
Once the check information is acquired, you can place the information in SD-RevenueBuilder in the same payment area you'd place credit card information. You can see the expected format by hovering over input fields.
With this completed and billing events setup in SD-RevenueBuilder you're almost ready to run auto-check drafts.
Printing the checks
Only one element remains, and that is having appropriate paper to print to.
Though you can technically print checks on any paper, to minimize the chance of your bank rejecting the check, you should use check stock. This is paper that has the background color and security features of a check, but no actual content. You can order this from any number of sources, and it's not expensive. We recommend you order a few hundred sheets at a time, as you'll likely need to print a few checks at a time. Here's an example of this type of paper stock you can order.
As far as SDRB is concerned, it will print the applicable check contents in the top 3.5” of an 8.5 x 11" sheet (the actual check portion). In the second 3.5” (approximately the middle of the sheet) it will re-print identical imagery (this essentially becomes your check stub). The result (one check per sheet) looks very much like the following:
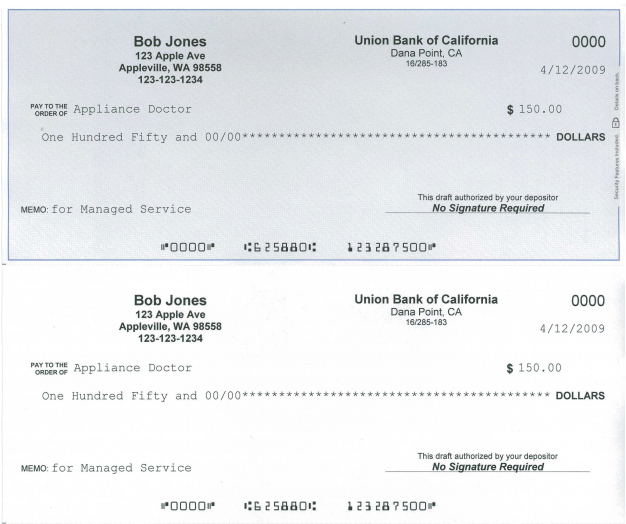
You'll use SDRB to create these checks (and to auto-document having done so, etc.), then deposit them in your bank account. It's what we do here, and we love it!
SD-RevenueBuilder can't print that cool check font at the bottom of each check (where the account number and routing number go) unless your computer has the appropriate font installed. This font is called MICR (Magnetic InkCharacter Reading). You can find your own online, or check here for a free download.
A MICR font will need to be install on any computer you wish to print checks from.