Caller-ID setup
Please note this manual has a companion/counterpart in the Auto-Dialer Handbook. Arguably, one handbook might have incorporated instructions to cover both areas. However, they are rather different animals and . . . well . . . circumstances simply did not evolve that way.
Getting Caller-ID information integrated into your ServiceDesk call-taking screen is powerful. Before even picking up the phone, a CSR can easily know who is calling, past history and current status on any pending job. Potentially, the phone may be answered with a greeting such as:
- “Hello Mrs. Jones, I bet you’re calling about the repair on your oven. Checking presently, I can see the part came in just an hour or so ago, and we were getting ready to call to get you scheduled . . . so it’s great that you called.”
You might imagine: that kind of greeting could impress your customer very much.
Of course, integrated Caller-ID also allows you to effortlessly and perfectly insert telephone numbers — simply for the sake of getting them into Callsheets, where needed.
Using Caller-ID information within ServiceDesk
Later chapters will describe how to get Caller-ID information into ServiceDesk. In this chapter, we’ll describe how it appears, and how to use it.
Basically, if the phone is ringing, you want to place the Windows focus into ServiceDesk’s first-vacant Callsheet (the shortcut command by which to instantly get there, from any other Callsheet, is Ctrl+End; if you need to first instantly get the focus into your Callsheets, hit F1).
When the first-vacant Callsheet has the Windows focus, and when Caller-ID info is currently offered, it will display such info in this fashion:
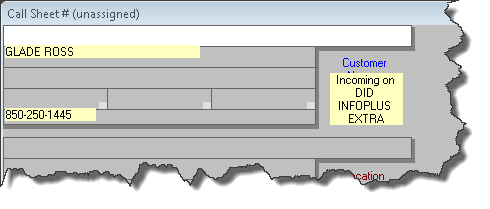
To make direct use of the displayed name, simply click on it. In response, the system will insert the name into the CustomerName box. This, obviously (besides getting the name into the box), will trigger a CstmrDbase search on that name, just the same as if you’d typed it.
Similarly, to make direct use of the displayed telephone number, simply click on it. Just the same as clicking on the name, this both inserts the text, plus automatically triggers a CstmrDbase search.
Usage is that simple.
How to setup with devices from CallerID.com
This company specializes in creating hardware that’s designed to pull Caller-ID info out of the stream of data that’s associated with incoming phone calls — in particular, in a context that makes the data available to software systems running within local PCs. It’s their hardware that we first created program code to work with.
If you are interested using a CallerID.com solution, we suggest you go to their website and review their offerings. They have systems that work with old-fashioned telephone lines and ones that work with more modern VOIP-based systems. If you need more explanation than you can glean from looking directly at what is online-presented, their personnel are very accessible and easy to talk to.
If you decide you want to purchase any CallerID.com device, Rossware can get you a 10 percent discount by placing the order for you.
In terms of interfacing with your computer system, CallerID.com hardware falls into two broad classes: (1) devices that connect directly to a particular PC (and thus only provide info to that PC; and (2) devices that connect to your network via an Ethernet port (and thus provide information to any computer that’s in the network).
Many years back, when we first created integration with CallerID.com devices, they only offered hardware in the first category. Naturally, ServiceDesk users did not want to buy a separate Caller-ID device for each ServiceDesk station. So, we made a system whereby the particular computer that connects to the device may offer to share its information with others in the network, and others in the network can look for (and receive) that shared-by-a-particular-station information.
Setup for the above is (as is setup for all elements of Caller-ID integration) managed via ServiceDesk’s CallerID-Setup interface. In particular, it’s done via the set of selections shown here:
- To get to this interface, click on “File Functions” in the ServiceDesk Main Menu, and select “CallerID Setup” from the dropdown.
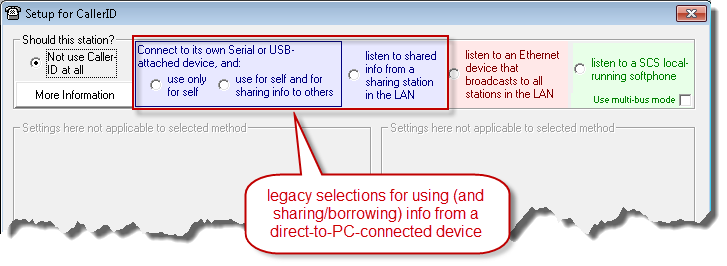
When any of the above options are selected, boxes appear within the body of the interface, which include instructions on what needs to be filled in, so as to enable the intended functionality. We think, going forward, few people will be purchasing the older style hardware that corresponds with these options, so will not delve more into instructions in their regard at this time.
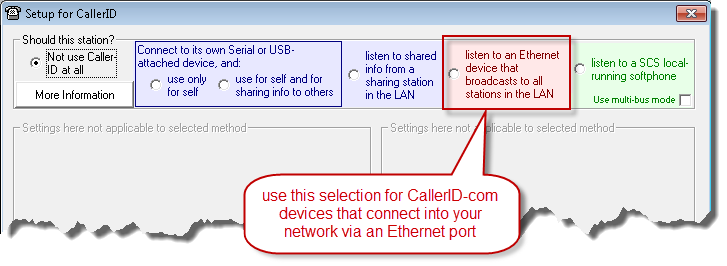
The other method for using a CallerID.com device is via any of their (more modern) devices that are designed to connect directly into your network via an Ethernet port. These are super-easy to setup with all of your stations, and are a wonderful way to go. For this option, you’ll of course use this selection:
How to setup with a ServiceCompanySolutions-Managed telephone system
If you do not know, Service Company Solutions (SCS) is the company that provides the Appliance BlueBook and MPH Search and MPH Diagnostics (solutions Rossware systems also integrate with, which are likewise also specifically tailored toward appliance service companies). In 2018 they began offering full-featured telephony unified communication systems, and we created integrations with these as well.
The thing that is particularly nice about our integration with SCS UC System is it works simultaneously for both auto-dialing and Caller-ID integration, as well as managing call instance with call recordings inside of ServiceDesk Systems.
Integration is simple: contact Service Company Solutions to activate these great functionailities and they will send you simple instructions. 877.877.8635